- Adjustable wrench or spanner
- Measuring tape & level
- Pipe cutter or hacksaw
- Plumber’s tape (Teflon tape)
- Closet auger or toilet auger
- Screwdriver set
- Putty knife and plumber’s putty
- Safety gloves and eye protection
Bathroom plumbing can feel overwhelming when you’re staring at exposed pipes, confusing diagrams, and the fear of getting it wrong behind the walls.
One small mistake can lead to leaks, poor drainage, or costly repairs down the line. Whether you’re remodelling a bathroom or tackling plumbing for the first time, the uncertainty alone is enough to stall the entire project.
That’s exactly why we created this step-by-step guide to plumbing a bathroom. From toilets and sinks to showers and drains, we break the process down into clear, manageable steps that actually make sense. This guide walks you through each stage so you can plan smarter, work cleaner, and avoid the mistakes that turn small plumbing jobs into expensive repairs.
Read on!
How to Plumb a Toilet

Toilet plumbing might seem like a difficult task. But it’s not as tough as it appears. Our guide makes it easy with a few simple steps. Before that, just glance at some essentials required for your toilet plumbing installation.
- Adjustable wrench or spanner
- Measuring tape & level
- Pipe cutter or hacksaw
- Plumber’s tape (Teflon tape)
- Closet auger or toilet auger
- Screwdriver set
- Putty knife and plumber’s putty
- Safety gloves and eye protection
Step-by-Step Toilet Plumbing Process
Here’s a five-step plumbing process for your toilet.
Step 1: Mark the Toilet Location

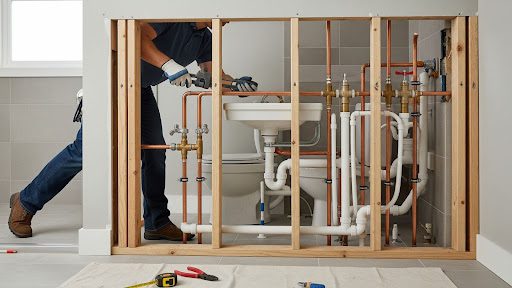
First, measure carefully before cutting anything. Mark the toilet over the drain opening. This matches standard bathroom plumbing rough-in diagram layouts. You can see above in the bathroom plumbing diagram.
Step 2: Install the Toilet Drain Pipe

Next, install the drain pipe. This pipe connects to your main sewer line. Make sure it’s secure and level. This is the crucial step for proper drainage.
Step 3: Secure the Toilet Flange

Now, attach the flange firmly to the floor. The flange should fit over the drain pipe. Use screws for a tight fit. The flange holds the toilet in place.
Step 4: Connect the Water Supply Line

Wrap plumber’s tape on threaded connections. Now, connect the supply line without overtightening. Check valve alignment carefully.
Step 5: Set Up and Test the Toilet

Finally, set the toilet onto the flange. Secure it with bolts. Connect the water supply. Turn on the water slowly. Flush to check for leaks.
What are Common Toilet Plumbing Mistakes to Avoid?
Common toilet plumbing mistakes include overtightening bolts, which can crack porcelain, and reusing old wax rings, causing leaks and odors. Additionally, poor leveling leads to rocking, while incorrect flange height or improper venting results in clogs and slow drainage.
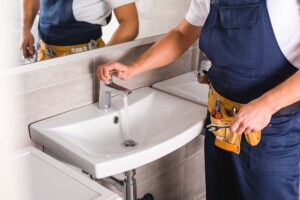
How to Plumb a Bathroom Sink

good working sink in a bathroom is necessary as it handles daily water use. An unnoticed leak is just a minor issue, but it can cause serious problems like mold growth and damaged flooring. That’s why plumbing correctly is necessary to prevent such issues.
What Sink Plumbing Components Do You Need?
- Sink strainer and drain flange
- Faucet body and handles
- P-trap, trap bend, and trap arm
- Tailpiece with extension pipes
- Hot and cold water supply lines
- Slip nuts and washers
- Angle stop (shut-off) valves
- Plumbing tape
Step-by-Step Sink Plumbing Process
Here are the steps for your bathroom’s sink plumbing.
Step 1: Install the Drain and P-trap

First, install the sink strainer. Then attach the tailpiece. Connect the P-trap to the tailpiece. The P-trap prevents sewer gases.
Step 2: Run Hot and Cold Water Lines

Next, run the hot and cold lines. These connect to the wall and go to your faucet. Here, you need to make sure that the connections are tight.
Step 3: Connect Shut-off Valves

Now, you’ll want to install the shut-off valves directly onto your water lines. These are absolute lifesavers because they let you kill the water to just the sink. If you ever have a small leak later, you won’t have to turn off the water for the entire house!
Step 4: Attach Faucet and Supply Lines

Go ahead and mount your faucet onto the sink deck. Once that’s snug, connect your hot and cold flexible lines to those shut-off valves you just installed. Give them a firm turn with your wrench, but don’t overdo it. You want them tight enough to stay dry, not crushed.
Step 5: Test for Leaks and Water Flow

Slowly, turn on the water and check all the connections for leaks. Run both hot and cold water. Make sure the flow is good.
What are the Common Sink Plumbing Mistakes to Avoid?
Avoid improper venting, which leads to slow drainage and gurgling, and over-tightening connections, which cracks seals. Always ensure P-traps are level, and never mismatch pipe materials, as these errors cause persistent leaks and water damage.
How to Plumb a Shower with Easy Steps

Shower plumbing controls water pressure and avoids drainage. Errors here are costly to fix later, so planning is key before closing walls.
What are the Basic Parts of Shower Plumbing?
- Shower strainer and drain
- Hot and cold water supply lines
- Showerhead and arm
- Shower valve (mixing or pressure-balancing valve)
- Pipe fittings and connectors
- Slip nuts, washers, and plumber’s tape
Step-by-Step Shower Plumbing Process
Look at our five-step shower plumbing process.
Step 1: Install the Shower Drain

Align the drain with your shower base. Connect the P-trap as shown in the diagram of shower drain plumbing to the main waste line. Ensure a slight downward slope for perfect drainage.
Step 2: Set the Shower Valve

Mount the shower valve to the wall studs. Position it about 48 inches high. Use a level to keep it straight for the handles.
Step 3: Run Hot and Cold Supply Lines

Now, bring the water to the valve. Connect your hot and cold lines to the corresponding sides of the shower valve.
Step 4: Connect the Showerhead and Controls

Run a pipe upward from the valve to where the showerhead will sit. This is called the shower riser. Attach the shower arm elbow at the top
Note: If you’re doing a big renovation, take a second to look at the bigger picture. Since your pipes are already exposed, it’s the perfect time to check how heavy rain affects your sewer system. It’s much easier to fix a drainage issue now than to deal with a messy backup after you’ve finished your beautiful new bathroom!
Step 5: Pressure Test the System

Before you close the walls, test everything. Cap off the shower arm and turn on the water. Check every joint for even the tiniest drop of water. It is much easier to fix a dishwasher leak than a leak buried behind shower tiles.
What are the Common Shower Plumbing Mistakes to Avoid?
Neglecting proper slope for drainage, failing to secure pipes against “water hammer,” and misaligning the mixing valve often lead to costly leaks. Always ensure proper venting to prevent sewer odors and double-check waterproof sealing behind walls to avoid structural rot.
When to Call a Professional Plumber?
Some bathroom plumbing tasks need expert hands. If pipes must be moved or resized, it’s best to call a professional. Plumbing codes can also be confusing, and mistakes may lead to failed inspections or future issues.
Hidden leaks behind walls are another major concern. These leaks often go unnoticed and cause expensive damage later. A professional plumber saves time, stress, and costly repairs in the long run.
Why Choose Sketchley Mason Plumbing?
At Sketchley Mason Plumbing, we treat your home like our own. We know that a “small leak” is never actually small. Our team brings years of experience to every job, from simple sink repairs to full bathroom rough-ins. We pride ourselves on clear communication, fair pricing, and work that lasts for decades. Don’t leave your pipes to chance; choose the name the community trusts.
Conclusion
Bathroom plumbing doesn’t have to feel intimidating. When broken into clear steps, the process becomes much easier to manage. Careful planning and proper testing make all the difference. So, avoid shortcuts and address issues early. When things feel uncertain, calling a professional is always a smart decision.
Frequently Asked Questions
What are the three stages of plumbing installation?
The three stages are the underground rough-in (pipes under the floor), the above-ground rough-in (pipes in the walls), and the “set out” or “trim out” where you install the actual sinks, toilets, and showerheads.
Do you tile walls before or after fitting a bath?
You should always fit the bathtub first. The tub needs to be secured and levelled against the studs. Once the tub is in place, install the backer board and tile over the lip of the bath to create a waterproof seal.
What are two things you should never flush down a toilet?
Never flush “flushable” wipes or feminine hygiene products. Even if the box says they are safe, they don’t break down like toilet paper. These things can cause massive clogs in your pipes or the city sewer system.
What is the 3/4/5 rule for tiling?
The 3/4/5 rule is a simple way to ensure your layout is perfectly square. If one side of a triangle is 3 units and the other is 4, the diagonal must be 5. It keeps your tile lines straight.
What are common bathroom layout mistakes?
Common mistakes include placing the toilet in direct view of the door, not leaving enough “elbow room” around the sink, and forgetting to plan for adequate ventilation to prevent mold and mildew growth.