

Have you ever woken up in the middle of the night in horror, only to hear that nightmarish sound—“drip… drip… drip�
You’re not imagining things. You’ve just been cursed—with what we professionally diagnose as Faucet-Induced Insomnia Syndrome (F.I.I.S.)
(Totally real. Definitely not made up. Probably.)
You’re also not alone. 94% of people have been woken up by nighttime noises at some point, and nearly half endure these disturbances every single night.
The humble faucet, with its villainous little drips, has joined the ranks of snoring partners and howling street dogs as a certified sleep saboteur.
If you haven’t experienced it yet, lucky you. But consider this your manual to prevent future nightmares, both in your wallet and your REM cycle.
If you have… our condolences. But don’t worry—this guide covers everything you need to know about leaky faucets: why they leak, how to fix them, and how to stop them from ruining another night.
Whether you’re a seasoned DIY warrior or just someone desperately whispering “make it stop,†this guide will arm you with everything you need to take down the freaky faucet—for good.
DIY Guide to Fixing the Faucet
Before calling a plumber, you can tackle many leaky faucets yourself. Here’s a detailed step-by-step guide for different faucet types:
10 Tools You’ll Need To Repair a Leaking Faucet (Detailed Breakdown)
As you take on this challenge to banish the Freaky Faucet, you must be equipped with your personal toolkit (a.k.a. weapons) for this plumbing battle.
Here is the list of 10 such legendary weapons that shall vanquish the Freaky Faucet.
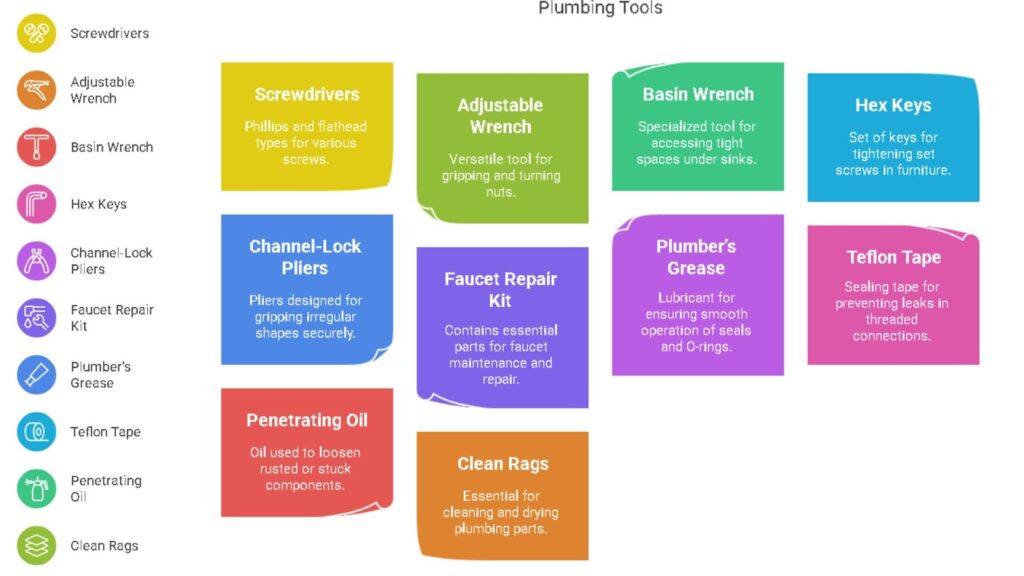
- Screwdrivers: Phillips (#2) and flathead (wide blade).
- Adjustable Wrench: 6–12″ capacity; look for one with smooth jaws to avoid scratching fittings.
- Basin Wrench: For hard-to-reach nuts under the sink.
- Hex Keys (Allen Wrenches): 1/16″–1/4″ sizes for set screws.
- Channel-Lock Pliers: For gripping odd shapes.
- Faucet Repair Kit: Includes assorted washers, O-rings, and seats—check compatibility with your faucet brand.
- Plumber’s Grease: Silicone-based grease for lubricating O-rings and seals.
- Teflon Tape: 3/4″ plumber’s tape for threaded connections.
- Penetrating Oil: To free stuck nuts and parts.
- Clean Rags or Sponges: For cleanup and soaking parts.
How to Fix Different Styles of Faucets
Before fixing the different types of faucets, make sure to follow the two tips below:
- Turn off the water by locating the shut-off valve under the sink and turning it clockwise.
- Remove the handle by prying off the decorative cap and unscrewing the handle screw.
Now, let’s dive into fixing the different styles of faucets:
(A) Fixing a Leaky Compression Faucet (Two Handles)
- Clean Valve Seat: Remove mineral deposits with vinegar or a dressing tool.
- Reassemble: Reverse the steps; avoid over-tightening.
- Test for Leaks: Turn water on slowly; check both handles.
(B) Fixing a Leaky Cartridge Faucet (Single Handle)
- Remove Handle & Trim: Loosen set screw; lift handle; remove trim.
- Extract Cartridge: Use pliers, noting orientation.
- Replace Cartridge/Seals: Match new cartridge; install seals.
- Reassemble & Test: Check for leaks.
(C) Fixing a Leaky Ceramic Disc Faucet (Single Handle)
- Unscrew Cylinder: Expose ceramic discs.
- Clean or Replace Discs: Remove buildup or swap discs.
Reassemble & Check: Ensure smooth operation and no leaks.
When DIY Gets Dicey: Time to Call the Professionals!
You’ve battled the Freaky Faucet, armed with tools and knowledge. But sometimes, the leak fights back harder, or maybe you’ve uncovered a bigger issue. If:
- The leak persists after trying these steps.
- You can’t remove a stuck part without excessive force (which risks breaking something).
- The faucet body itself is cracked or heavily corroded.
- You’re simply not comfortable proceeding or don’t have the time.
…then it’s time to call in the reinforcements! If you’re in Simi Valley or the surrounding areas, don’t hesitate to contact the expert plumbers at Sketchley Mason Plumbing. We have the experience and tools to diagnose and fix any faucet issue quickly and reliably. Give us a call today!
Why Your Faucet Leaks and How to Prevent It
To fix a leaky faucet, you must first understand what’s causing the issue. Here’s a breakdown of the most common culprits:
1. Over time, the friction and pressure of turning the faucet on and off wear down Worn-Out Washers and O-rings (Compression Faucets) (rubber) components, causing them to crack, flatten, or become brittle, resulting in leaks.
| Prevention Tip: Avoid overtightening faucet handles and replace the washers frequently to extend the lifespan of the washers and O-rings. |
2. The valve seat is the fixed part against which the washer presses to stop water flow. Mineral deposits from hard water build up on the valve seat, creating an uneven surface. This prevents the washer from creating a perfect seal, which leads to leaks. (Corrosion can also damage the seat itself, further worsening the problem.)
| Prevention Tip: Clean the valve seat regularly by soaking a cloth in vinegar and wrapping it around it to dissolve mineral buildup. If the corrosion is severe,use a valve seat dressing tool. |
3. Cartridge faucets use a cylindrical cartridge with internal seals to control water flow. These are more modern designs than compression faucets.
Why They Fail: Wear and tear on internal seals or cracks in the cartridge can cause leaks. Hard water is often the culprit, as it can cause mineral buildup inside the cartridge, disrupting the seals.
| Prevention Tip: Install a water softener to soften the hard water, thus reducing the mineral buildup. Regularly inspect the cartridge seals for wear and replace them as needed. |
4. The freaky faucets have various parts that can loosen over time, especially around the packing nut or adjusting ring. These connections hold the valve stem in place, but vibration or general use can cause them to loosen, leading to water leakage.
| Prevention Tip: Tighten the connections periodically and avoid over-tightening, which can lead to stripping threads. |
Conclusion
Now that you’ve mastered faucet fixing 101, go slay that leak! If you found this helpful, bookmark it for your next plumbing adventure—or share it with a friend drowning in drips.
Remember, while many faucet leaks are manageable DIY projects, there’s no shame in calling for backup. If the drip wins the first round, or you’d rather leave it to the experts, Sketchley Mason Plumbing is always ready to help homeowners in the Simi Valley area. Your peace (and quiet!) is our priority.
Frequently Asked Questions (FAQs)
1. What is the most common cause of a leaky faucet?
Worn-out washers or O-rings in compression faucets. They’re rubber parts that wear down with time and friction.
2. Can I fix a leaky faucet myself without any plumbing experience?
Yes. Most leaks are caused by a single worn-out part and can be fixed with basic tools. If you can handle a screwdriver, you can handle this.
3. How long does it take to fix a faucet leak?
Around 20–45 minutes depending on the faucet type and how stuck the parts are. Cartridge and ceramic disc faucets are often quicker than compression ones.
4. What if my faucet is leaking from under the sink?
That’s a supply line or valve issue, not the faucet.
- Check the water connections.
- Tighten them gently.
- Replace any cracked or leaking pipes.
5. How much water does a leaky faucet waste?
One drip per second can waste over 3,000 gallons yearly—enough to take 180+ showers.