
That dripping faucet is easy to ignore until it starts costing you time, money, and peace of mind. What seems like a small annoyance can quickly turn into wasted water, rising bills, and a kitchen that feels outdated, no matter how clean it is. The U.S. EPA also notes that 10% of homes have leaks that waste 90 gallons or more per day, often caused by worn fixtures like dripping faucets and valves.
The good thing is that replacing a kitchen faucet is a straightforward upgrade that can instantly improve both function and appearance. With the right preparation and a clear process, most homeowners can handle it in just a couple of hours. But like any plumbing task, small mistakes can lead to bigger problems if you are not careful.
In this guide, you will learn exactly how to replace a kitchen faucet step by step, avoid common pitfalls, and understand when it is best to bring in a professional for a smooth, leak-free result.
- Replacing a kitchen faucet is a beginner-friendly project when you match the faucet to your sink configuration and prepare properly.
- The right tools, especially a basin wrench and new supply lines, make installation faster, safer, and far less frustrating.
- Following a clear step-by-step process helps prevent leaks, damage, and costly mistakes during installation.
- Most post-installation issues, such as low pressure or dripping, are easy to fix with simple adjustments, such as cleaning the aerator or tightening connections.
- DIY can save money, but calling a licensed plumber is the smarter choice when dealing with corroded valves, hidden damage, or complex setups.
Before You Start: Choosing the Right Faucet

This is the step most homeowners skip entirely, which is why so many end up making a second trip to the hardware store.
Count Your Sink Holes
Kitchen sinks come in different configurations: single-hole, three-hole, and four-hole setups. Your new faucet must match your sink’s existing holes, or you will need a deck plate (also called an escutcheon plate) to cover any unused openings. Before you purchase anything, get under your sink with a flashlight and count.
Check the Hole Spacing
Centerset faucets are designed for sinks with holes spaced four inches apart. Widespread faucets require 8 to 16 inches of clearance. Installing the wrong type means drilling new holes or returning the faucet — neither is a situation worth walking into.
Measure Under-Counter Clearance
High-arc faucets look stunning, but if your sink sits under a low cabinet, that tall spout may not clear it. Measure the vertical space between your sink and the bottom of any overhead cabinet before settling on a particular style.
Should You Replace or Just Repair?
| Situation | Best Action |
| The faucet is under 5 years old, dripping from the spout | Replace the cartridge only |
| The faucet is over 10 years old, has constant drips, and visible corrosion | Full faucet replacement |
| Leaking from multiple points at once | Full faucet replacement |
Tools And Materials You Need to Replace the Faucet
Getting organized before you slide under that sink will save you significant frustration. Here is exactly what to gather:
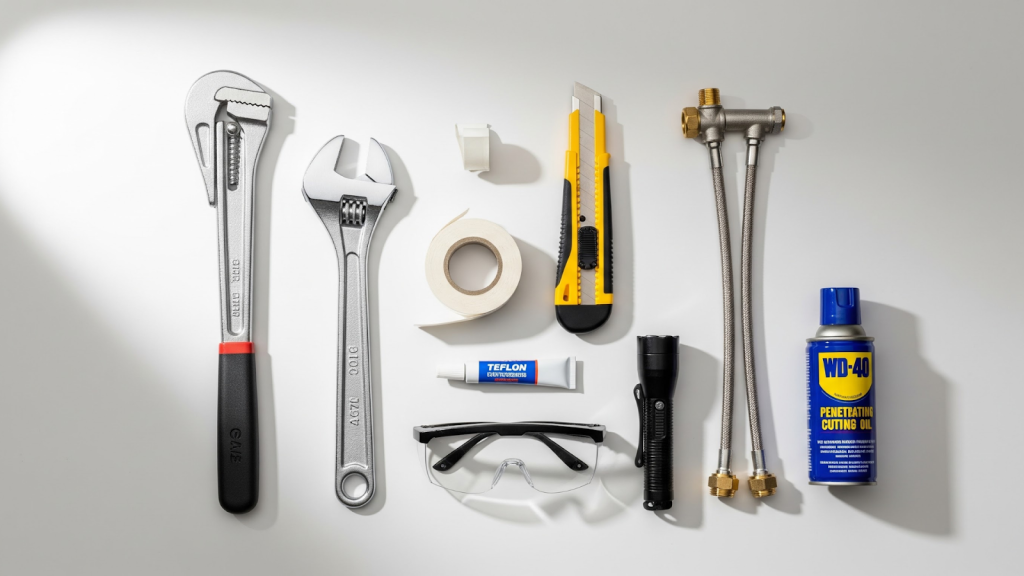
Essential Tools
- Basin wrench (the single most important tool for this job)
- Adjustable wrench
- Bucket and old towels
- Flashlight or headlamp
- Safety glasses
- Utility knife or putty knife
- Plumber’s tape (Teflon tape)
- Penetrating oil such as WD-40 or PB Blaster
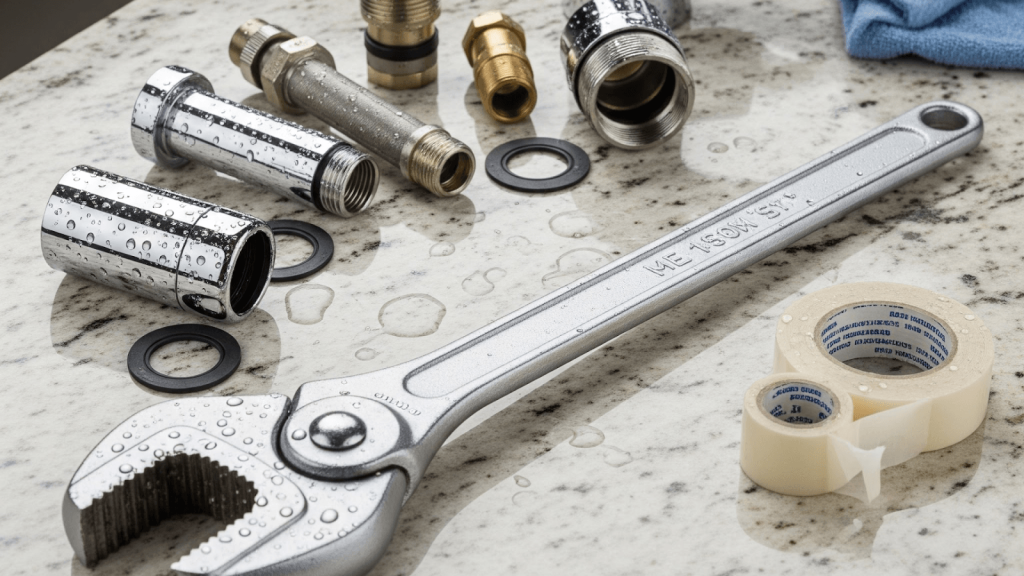
Materials to Buy
- New faucet with deck plate if needed
- New braided stainless steel supply lines (always buy new ones, never reuse)
- Plumber’s putty or silicone caulk, depending on the manufacturer’s instructions
- Thread seal tape
- Replacement shutoff valves if your current ones look corroded
The One Tool That Changes Everything
The basin wrench is what separates a smooth one-hour job from a three-hour ordeal. It has a long handle with a pivoting jaw designed specifically to reach up into the cramped space behind the sink basin and grip the mounting nuts you cannot otherwise see. Without it, you are working blind with tools that were never designed for this angle. Pick one up for around $20 to $35. It is worth every cent.
| Quick Tip: Before starting, always double-check that your water is fully turned off. If the valve under the sink does not stop the flow, shut off the main supply. A basin wrench will make tight under-sink work significantly easier and save you considerable effort. |
Step by Step: How to Replace a Kitchen Faucet
Step 1: Prep Your Workspace and Shut Off the Water
Before you touch anything:
- Clear everything out from under the sink completely. You need room to move and see.
- Locate the hot and cold shutoff valves on the supply lines beneath the sink.
- Turn both valves clockwise until firm.
- Open the faucet above to bleed pressure and drain residual water into your bucket.
One critical check: Turn the faucet handle back on and watch. If water still flows, the valves are not seated properly. Do not proceed. Shut off the main water supply to the house instead.
Step 2: Disconnect the Old Supply Lines
- Place your bucket directly under the supply line connections.
- Use an adjustable wrench to disconnect the lines from the shutoff valves.
- As each line comes off, label or photograph it. Hot is traditionally on the left, cold on the right. This small step prevents one of the most common post-install mistakes.
Safety Note: If you have a garbage disposal, unplug it or flip its circuit breaker before reaching into the cabinet. This is not optional.
Step 3: Remove the Old Faucet
This is typically the hardest step, especially in homes with hard water, where mounting nuts tend to corrode.
- Use your basin wrench to reach up and turn the mounting nuts counterclockwise.
- If they will not budge, apply penetrating oil around the base of each nut.
- Wait 5 to 10 minutes and try again. Repeat if needed.
Warning: Do not force a seized nut with excessive leverage. Stripping it in that tight space creates a problem far worse than the original faucet.
Step 4: Clean the Sink Deck
Once the old faucet is out, take a few minutes here before reaching for the new one.
- Use a putty knife to scrape away old plumber’s putty and sealant residue.
- Wipe down the surface with a damp cloth to remove mineral scale and grime.
- Inspect the inside of the cabinet for soft wood, water staining, or mold.
Important: If you find evidence of hidden water damage, address it before installing the new faucet. Installing over existing damage means the problem continues quietly until it worsens significantly.
| Note for Stone Countertops: If your countertop is granite, quartz, or tile, use the putty knife with a light touch. These surfaces scratch more easily than most homeowners expect. |
Step 5: Install the New Faucet
- Thread the new faucet’s supply lines down through the sink hole or holes.
- If using a deck plate, position it first with its gasket or a thin ring of plumber’s putty around the perimeter.
- Lower the faucet into position.
- Go back under the sink and install in this exact order: rubber washer, then metal washer, then mounting nut.
- Hand-tighten the mounting nut first, then snug it with your basin wrench.
The most common mistake at this step: Overtightening. It cracks rubber washers, warps the sink deck, and strips threads. Firmly snug is the right amount of force. If it already feels tight, stop.
Step 6: Connect the Supply Lines
- Attach the hot line to the hot shutoff valve (left side).
- Attach the cold line to the cold shutoff valve (right side).
- Hand-tighten each connection first, then snug with a wrench. One quarter turn past hand tight is enough.
On Teflon tape: Many modern braided stainless steel supply lines come with factory-installed rubber seals, so tape is not always necessary. Check the instruction sheet that came with your supply lines. For any exposed threads, wrap two to three times clockwise before threading.
| Pull down sprayer? Attach the hose and install the counterweight now, following the manufacturer’s diagram. The counterweight keeps the hose retracting cleanly and takes about 60 seconds to install. |
Step 7: Test for Leaks and Flush the Lines
Turn the water back on slowly:
- Open the cold shutoff valve first, then the hot shutoff valve.
- Use your flashlight to inspect every connection point immediately. Look for moisture, weeping, or dripping.
- Check the supply line connections and the base of the faucet where it meets the sink deck.
Run the faucet:
- Let both handles run for 2 to 3 full minutes.
- Sputtering or cloudy water at first is completely normal. It is just air in the lines and clears on its own.
If you notice low pressure after flushing:
- Unscrew the aerator at the tip of the faucet spout.
- Rinse the small mesh screen under running water.
- Reinstall. Debris from the supply lines commonly gets trapped here and is one of the easiest fixes in plumbing.
Final Check: Come back and look under the sink one more time after 24 hours have passed. Some slow leaks only reveal themselves after sustained pressure.
Common Mistakes After Installation and How to Fix Them
| Problem After Installation | Likely Cause | Fix |
| Still dripping from the spout | Cartridge issue or loose internal connection | Check all supply connections first; if the drip persists, the cartridge may need replacement |
| Low water pressure | Debris trapped in the aerator | Unscrew the aerator, rinse the mesh screen, reinstall |
| Faucet wobbles or shifts | Mounting nut not fully tightened | Re-tighten mounting hardware from under the sink with a basin wrench |
| Sprayer does not retract | Kinked hose or missing counterweight | Check hose routing and verify counterweight is installed |
| Water sputters or looks cloudy | Air in the supply lines | Normal. Run both hot and cold for two to three minutes to clear |
| Leak at the supply line fitting | Under or overtightening, or missing tape | Snug to hand tight plus one quarter turn; add Teflon tape if threads are exposed |
| Hot and cold reversed | Lines connected to the wrong valves | Shut off the water and swap the supply line connections |
Cost Breakdown: DIY vs. Hiring a Plumber
| Scenario | Faucet Cost | Labor Cost | Total Estimate |
| DIY with a budget faucet | $50 to $120 | $0 | $50 to $120 |
| DIY with mid-range faucet | $160 to $370 | $0 | $160 to $370 |
| Pro install, simple replacement | $160 to $370 | $150 to $350 | $310 to $720 |
| Pro install, complex (corroded valves, etc.) | $200 to $400 | $300 to $600 | $500 to $1,000+ |
| High-end faucet with pro install | $400 to $800 | $260 to $480 | $660 to $1,280+ |
Should You DIY or Call a Plumber?
DIY is the right call when:
- It is a direct like-for-like swap with the same number of holes and the same spacing
- Your shutoff valves turn smoothly and seal completely
- The supply lines and fittings are accessible and in good condition
- There is no garbage disposal or unusual under-counter obstruction
- You have a few hours, the right tools, and you are comfortable working in a tight space
Call a licensed plumber when:
- The shutoff valves are stuck, corroded, or will not fully close
- You discover soft wood, staining, or mold inside the cabinet
- The supply lines are brittle, discolored, or show mineral crust
- The job requires drilling new holes, especially in granite or quartz
- Leaks persist after installation, and you cannot locate the source
- You are not confident, and rushing increases the risk of a bigger problem
What starts as a $150 faucet project can quietly become a $1,500 water damage repair if the wrong thing goes wrong in the wrong place. Experience matters more in plumbing than in almost any other home repair category.
| Hit a Snag? Simi Valley’s Most Trusted Plumbers Are One Call Away Sometimes what starts as a simple faucet swap reveals corroded shutoff valves, stubborn old fittings, or hidden water damage inside the cabinet, changing the entire scope of the job. That is exactly when experience makes the difference between a clean repair and an expensive one. Sketchley and Mason Plumbing has been trusted by Simi Valley homeowners since 1921. Our licensed plumbers handle everything from straightforward faucet installation to full kitchen and bathroom remodels, with transparent pricing and work built to last. No surprise fees. No runaround. Just plumbing done right by people who have been doing it in this community for over a century. Request a free quote |
Conclusion
Replacing a kitchen faucet is one of the more manageable home repairs, and with the right tools and preparation, many homeowners handle it successfully. But plumbing has a way of revealing surprises the moment you get started.
The job you planned for an afternoon does not always stay that size.
Knowing your limits is not a weakness. It is what separates a $200 fix from a $2,000 one. If anything in this guide gives you pause, or if your project has already moved beyond a straightforward swap, the smartest next step is a quick call to someone who has seen it all before.
Frequently Asked Questions
Do I need a permit to replace a kitchen faucet in Simi Valley?
No permit is required for a straightforward like-for-like faucet replacement in Simi Valley. Permits are typically only needed when work involves altering the plumbing supply system, moving drain lines, or modifying the countertop structure.
My new faucet has fewer holes than my sink. What should I do?
Use a deck plate, also called an escutcheon plate, to cover the unused holes. Most three-hole faucets include one in the box. Just verify the plate’s dimensions cover your sink’s hole spacing before purchasing.
Can Simi Valley’s hard water damage a new faucet?
Yes, over time. Simi Valley’s water supply contains minerals that accelerate wear on internal faucet parts. Choose ceramic disc cartridges and mineral-resistant finishes such as brushed nickel or stainless steel to significantly extend your faucet’s lifespan.
Can I replace just the cartridge instead of the whole faucet?
Yes, if the faucet body is in good condition and under ten years old. A cartridge replacement typically costs $15 to $40 and fixes most drip and flow issues without requiring a full kitchen faucet replacement.
There is still dripping after I replaced the faucet. What now?
First, check all supply line connections for tightness. If the drip comes from the spout itself, the new cartridge may be improperly seated or defective. Remove and reinstall the cartridge following the manufacturer’s guide before assuming the faucet is faulty.
Why is my faucet dripping when the water is turned off?
A drip with the handle in the off position almost always indicates a worn cartridge or an internal valve seat that is no longer sealing cleanly. The fix is usually a cartridge replacement rather than a full faucet swap.