- A faucet dripping once per second wastes over 3,000 gallons of water per year. Fixing it early saves money and prevents further plumbing damage.
- Most leaky faucet repairs cost $5 to $40 in parts and take under an hour using basic tools you likely already own.
- Always diagnose the source of the leak before buying parts: a spout drip, a handle leak, and a base leak each point to a different worn component.
- Never buy replacement parts before opening the faucet; bring the old part to the store for an exact match, as faucet parts are not universal.
- If the faucet keeps dripping after repair, check for a wrong-size part, incorrect cartridge orientation, mineral buildup on the valve seat, or a damaged seat that needs resurfacing.
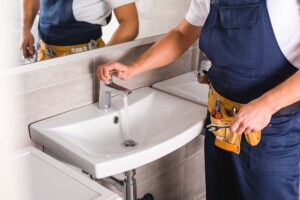
That single drip from your kitchen or bathroom faucet may seem harmless at first. But listen to it through the night, then glance at your water bill at the end of the month, and suddenly it does not feel so small. What starts as a minor annoyance quickly turns into wasted water, higher costs, and added strain on your plumbing.
In fact, a faucet dripping once per second can waste over 3,000 gallons of water a year. That is not just a leak. It is like leaving a tap running without even noticing.
The good news is that most leaky faucets are simple to fix. With a few basic tools and the right parts, you can usually solve the problem in under an hour for less than 25 dollars.
This guide will show you exactly how to diagnose the source of the leak, fix it step by step, troubleshoot if it keeps dripping, and know when it is time to call a professional.
Why Is Your Faucet Dripping?
Before you reach for a wrench, it helps to understand what is actually causing the drip. Most guides skip this step, but it matters because the cause tells you exactly which part needs to be replaced.
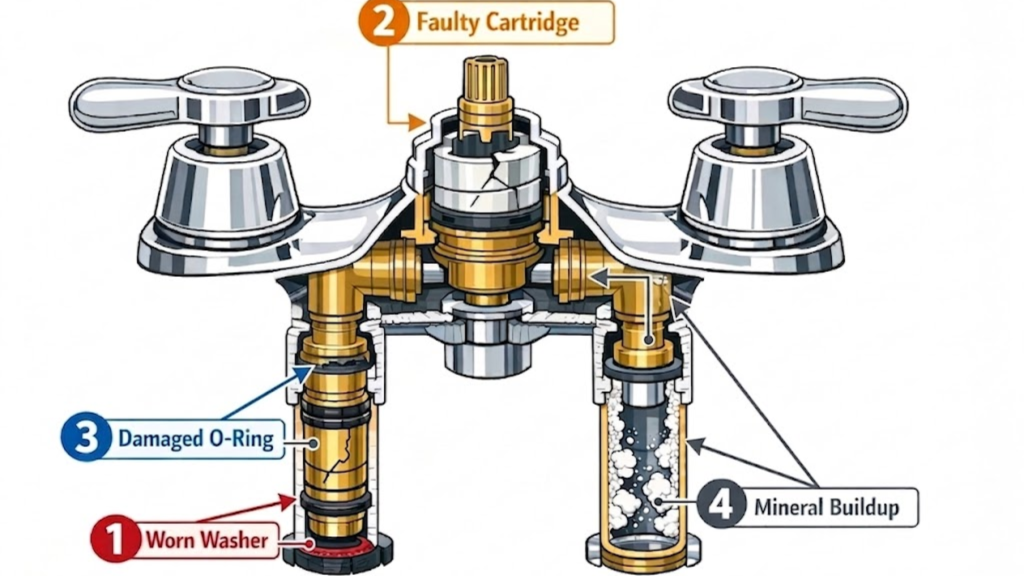
1. Worn washer or seat washer
This is the most common cause of a dripping faucet, especially in older two-handle compression faucets. Every time you turn the faucet on, a rubber washer presses against a metal seat. Over time, it wears down, cracks, or develops grooves, which leads to a steady drip.
2. Faulty or cracked cartridge
In modern single-handle faucets, a cartridge controls the flow of water. When it becomes worn or cracked, water can leak from the spout even when the handle is fully off. This is one of the most common causes of leaks in kitchens and bathrooms built after the 1990s.
3. Damaged O-ring
O-rings create a seal around the handle and base of the faucet. When they wear out or break, water leaks around the handle or collects at the base instead of dripping from the spout.
4. Mineral buildup
In areas with hard water, mineral deposits can build up inside the faucet over time. These deposits prevent seals from sitting properly, leading to leaks and accelerating the wear of washers, O-rings, and cartridges.
| Simi Valley homeowners take note: Southern California is a hard water region. Elevated calcium and magnesium levels in the water supply significantly accelerate wear on faucet parts. If your faucets seem to need repair more often than they should, hard water is likely the reason. |
Where Is the Leak Coming From?
Pinpointing the leak location takes 30 seconds and tells you exactly what part you need.
| Leak Location | Most Likely Cause | What to Replace |
| Drip from the spout (water off) | Worn washer or cracked cartridge | Washer or cartridge |
| Leak around the handle | Damaged or deteriorated O-ring | O-ring set |
| Water pooling at the base | Body seal or O-ring under the spout | O-ring kit |
| Water below the sink | Supply line or shut-off valve issue | Not a faucet problem, call a plumber |
Note: If the leak is at the supply line connection under the sink, then it is a separate plumbing issue that may require a licensed plumber.
Tools and Parts You Will Need
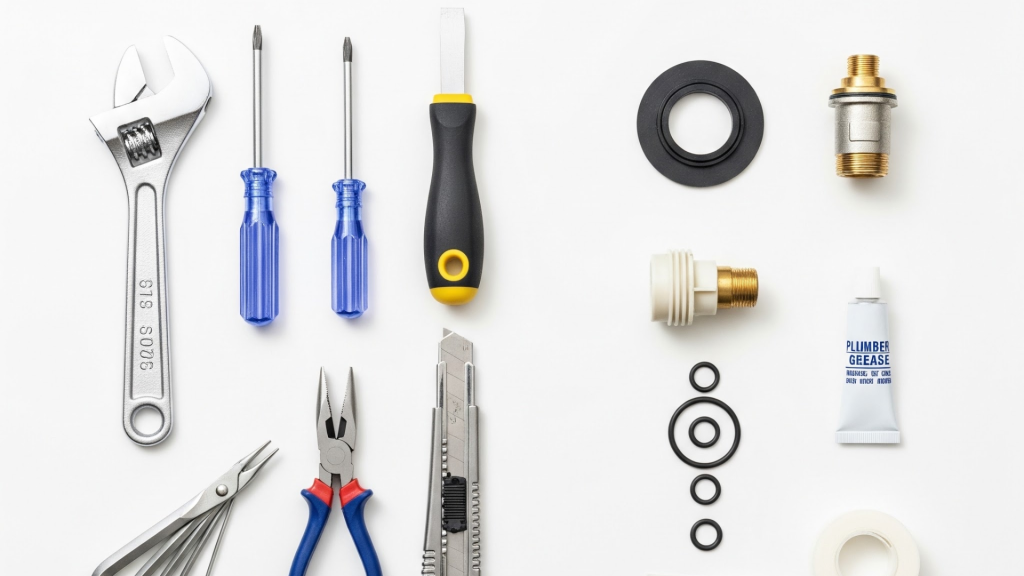
Tools:
- Adjustable wrench
- Phillips and a flathead screwdriver
- Allen wrench set (hex keys)
- Needle-nose pliers
- Utility knife
Replacement Parts:
- Washer or cartridge (matched to your faucet brand)
- O-ring set
- Plumber’s grease
- Teflon tape
| Pro Tip: Do not buy replacement parts before you open the faucet. Remove the worn part first, place it in a zip-lock bag, and take it to the hardware store for an exact match. Faucet parts are not universal; even a slightly smaller washer will not seal properly. |
Estimated cost: DIY parts typically run $5 to $25. A full faucet repair kit costs $10 to $40.
Before You Start
Skipping this step is how beginners end up with water spraying across the bathroom. It takes only a couple of minutes, but it is essential.
- Shut off the water supply: Turn the valves under the sink clockwise until they are fully closed. If your sink does not have individual shut-off valves, turn off the main water supply for the house. Then open the faucet to release any remaining pressure in the line.
- Plug the drain: Small parts like a cartridge clip or an O-ring can fall into an open drain in seconds, bringing your repair to a halt. Block the drain before you begin.
- Take a reference photo: Before taking anything apart, capture a clear photo of the faucet assembly. This will act as your guide when putting everything back together and only takes a few seconds.
How to Fix a Leaky Faucet
These six steps work for all standard faucet types, including compression, cartridge, ball, and ceramic disc. Where a type has a small variation, it is explained within that step, so you do not need to follow multiple guides.
Step 1 — Remove the Handle
Start by locating the decorative cap on top of the handle. Gently pry it off using a flathead screwdriver. Underneath, you will find a screw. Remove it and pull the handle straight off.
Type note: For ball faucets, look for a small Allen screw on the side of the handle collar. For ceramic disc faucets, remove the escutcheon cap beneath the handle before lifting it off.
Step 2 — Expose the Internal Mechanism
With the handle removed, you will see the internal component that controls water flow. This may be a threaded brass stem in a compression faucet, a smooth cartridge in cartridge or ceramic disc faucets, or a rounded metal ball with springs and rubber seats in a ball-type faucet. This part is usually the source of the leak.
Type note: If you are unsure which type you have, take a photo of the internal parts and search using your faucet brand and model number, or bring the part to a hardware store for identification.
Step 3 — Remove and Inspect the Worn Part
Carefully remove the internal component and pay close attention to the direction it is facing. Proper orientation is important during reassembly.
- Compression: Unscrew the packing nut, remove the stem, and inspect the rubber washer at the bottom. If it appears flat, cracked, or grooved, it needs to be replaced.
- Cartridge: Pull the cartridge straight out and check for cracks or visible wear.
- Ball: Remove the cam, cam washer, and ball, then use needle-nose pliers to take out the rubber seats and springs inside the faucet body.
- Ceramic disc: unscrew and remove the cylinder, then inspect the rubber seals underneath for damage.
Step 4 — Replace the Worn Part and Apply Plumber’s Grease
Install the new washer, cartridge, seats, springs, or O-rings, depending on what was worn out. Before putting everything back, apply a light layer of plumber’s grease to all rubber components. This helps prevent damage during installation and extends the life of the parts.
Pro tip: While the faucet is open, replace the O-rings at the base and handle, even if they appear fine. They are inexpensive, and replacing them now can prevent another repair later.
Step 5 — Reassemble in Reverse Order
Rebuild the faucet by following the steps in reverse. Use your reference photo as a guide. Tighten all components firmly, but do not overtighten, as this can damage parts or create new leaks.
Type note: For cartridge faucets, make sure the cartridge is installed in the same direction as before. If the hot and cold water are reversed, the cartridge is likely installed incorrectly. Remove it and reinstall it in the correct orientation.
Step 6 — Turn the Water Back On and Test
Slowly open the supply valves instead of turning them on all at once. This prevents sudden pressure from disturbing the newly installed parts. Let the water run for about 30 to 60 seconds to clear any debris. Then turn the faucet off completely and observe the spout and base for a few minutes.
If there is no dripping, the repair is complete.
Faucet Still Dripping After the Repair?
This happens more often than most guides admit, and in most cases, the cause comes down to one of these four issues.
- Wrong part size: Even a slightly smaller washer will not create a proper seal. If the size is off, the drip will continue. Take the original part with you to the hardware store and match it exactly.
- Cartridge installed in the wrong orientation: This issue is specific to cartridge faucets. Remove the cartridge and check its alignment. It may simply need to be rotated into the correct position.
- Mineral deposits on the valve seat: In areas with hard water, calcium buildup can prevent a new washer from sitting flush against the valve seat. Clean the surface thoroughly with white vinegar before reinstalling the part.
Damaged valve seat: If the metal seat that the washer presses against is pitted or corroded, a new washer will not solve the problem. The seat itself needs to be replaced or resurfaced using a seat wrench.
| Still Leaking? Sketchley & Mason Can Fix It Fast. Some leaks go deeper than a worn washer. If your faucet is still dripping after following these steps, our licensed plumbers in Simi Valley are ready to help with transparent pricing and no surprises. Serving Simi Valley since 1921 | Free Estimates | 24/7 Emergency Service Get a Free Estimate → Call us: (818) 347-5508 |
Should You Repair or Replace the Faucet?
Once you have the faucet open, this decision becomes much clearer.
Repair the faucet if:
- It is leaking for the first time
- The replacement part costs under $30
- The faucet is less than 12 years old
- There is no visible rust or corrosion on the body
Replace the faucet if:
- It has leaked multiple times in the past year
- The faucet is 15 or more years old
- Replacement parts are discontinued or unavailable
- Visible rust, corrosion, or cracks are present on the body
Cost context: A DIY washer or cartridge replacement costs $5 to $40. Professional faucet replacement installed in the Simi Valley area typically runs $150 to $350.
How to Prevent Your Faucet from Dripping Again
A few minutes of simple maintenance each year can prevent most faucet leaks before they start.
- Clean the aerator every 6 to 12 months: Unscrew the aerator from the tip of the spout and soak it in white vinegar for about an hour. This removes mineral buildup, keeps water flowing smoothly, and helps prevent deposits from reaching internal components.
- Do not overtighten the handle: Turning the faucet off too forcefully compresses the washer against the valve seat every time you use it. Over time, this speeds up wear. A firm, gentle turn is enough to stop the water completely.
- Inspect O-rings and seals once a year: Take a few minutes to check visible seals and O-rings for signs of wear or cracking. Catching early damage can help you avoid a full repair later.
- Consider a water softener or filter: If you live in an area with hard water, installing a water softener or filter can significantly extend the life of your faucet’s internal parts. It is one of the most effective long-term methods for preventing recurring leaks.
Final Thoughts
A dripping faucet is easy to ignore. It is also easy to fix if you catch it early. The longer it goes unaddressed, the more water is wasted, the higher your utility bill climbs, and the greater the chance that wear spreads to surrounding components.
With the right tools, the correct replacement parts, and the steps outlined above, most homeowners can resolve a leaky faucet in under an hour. And if the repair turns out to be more involved than expected, acting sooner rather than later means the problem is still small and manageable.
Take action today and stop that drip for good.
Frequently Asked Questions
How do you fix a dripping faucet?
The process depends on your faucet type. For most modern cartridge faucets, you remove the handle, pull out the cartridge, and replace it with an exact match. For older compression faucets, the washer at the base of the stem is usually the culprit and can be replaced in under 30 minutes with basic tools.
Why is my faucet still dripping after I repaired it?
The most common reasons are a mismatched replacement part, a cartridge installed in the wrong orientation, mineral deposits remaining in the seal, or a worn valve seat that the new washer is pressing against.
Can I fix a leaky faucet myself?
Yes, in most cases. Cartridge and compression faucets are particularly DIY friendly. Ball faucets require a bit more attention due to their multiple internal components, but a complete repair kit simplifies the process considerably.
How much does it cost to fix a faucet?
DIY repairs typically cost between $5 and $30 for replacement parts. Professional repairs generally range from $100 to $250, depending on the faucet type and the parts that need to be replaced.
Does hard water cause faucet leaks?
Yes, hard water deposits mineral scale on internal components, which prevents proper sealing and accelerates wear on washers, cartridges, and O-rings. This is a particularly common issue in Simi Valley and the surrounding areas of Southern California.